Waffle-Skile.github.io
JavaScript
Prerequisite
개발 환경
- Node.js
- Node Package Manager(NPM): Node.js 설치될 때 같이 설치됨
- 텍스트 에디터 : HTML & CSS 자료 참고
- 웹 브라우저 : Google Chrome 권장
JavaScript
- 다른 프로그래밍 언어 Java와 큰 연관성은 없다!!
- “ECMAScript의 명세를 구현한 언어” (사실상 동일하다고 보아도 됨)
- ECMAScript 5.1 (2011.6) : 사실상 웹 표준
- ECMAScript 6 (2015.6) : 우리가 배울 것, React에서 사용하는 문법
- 인터프리터 언어
기초 문법
해당 자료는 프로그래밍 언어의 기초 문법(조건문, 반복문, 함수)에 대해서 이해하고 있음을 전제하고 보다 심화적인 문법에 대해 다루고 있습니다. (특히 C) 코딩에 처음 접하시는 경우 (References)[#references]의 생활코딩 강의를 먼저 공부하고 오시는 것을 권장합니다.
JavaScript는 웹 브라우저에서 널리 사용되는 스크립트 언어이지만, JavaScript 그 자체로도 프로그래밍 언어 입니다. 따라서 웹 페이지를 제어하는 스크립트를 다루기 이전에 JavaScript의 프로그래밍 언어적 특성을 먼저 다루고자 합니다.
강의 자료에 있는 JS 소스 코드를 실행시키는 방법에는 다음과 같이 여러 가지가 있습니다.
- Node.js 필요
- 명령 프롬프트 창에서
node를 치면 JavaScript 코드를 한 줄씩 실행시킬 수 있는 셸이 실행됩니다. *.js파일에 코드를 작성하고 명령 프롬프트 창에서node [파일_이름].js를 입력하면 해당 파일 내 전체 코드가 실행된 결과가 출력됩니다.
- 명령 프롬프트 창에서
- 웹 브라우저 필요
- 개발자 도구의 콘솔(Chrome의 경우, F12 - Console 탭)에는 JS 코드를 한 줄씩 실행시킬 수 있는 셸이 있습니다.
- JS 코드를
<script>태그로 감싼 HTML 파일을 작성하고 웹 브라우저로 해당 페이지를 엽니다. - JS 코드를
*.js파일에 작성하고,<head>에<script type="text/javascript" src="[파일_이름].js"></script>태그를 넣은 HTML 파일을 작성해 해당 웹 페이지를 엽니다.
'use strict';
변수와 상수
let, const
console.log(x);  // Reference Error

let x;
console.log(x);  // undefined

let y = 3, $_$;
x = 3 * y;
console.log(x);  // 9
console.log($_$);  // undefined

const AGE = 20;
AGE = 7;  // TypeError

const UNDEF;  // SyntaxError
var 또한 let과 유사하게 변수를 초기화시키는 기능을 담당합니다. (let 키워드는 ES6부터 지원합니다.) 하지만 var의 특성인 Hoisting이 입문자에게 혼란을 불러올 수 있기 때문에 호환 목적을 제외하고는 쓰지 않기를 권장합니다.
JS에서는 식별자(변수/상수) 이름에 $, _ 라는 문자도 사용할 수 있습니다.
Data Type
Number
console.log(typeof(1));  // "number"
console.log(typeof(1.5));  // "number"
console.log(typeof(0xff));  // "number"

max = Number.MAX_SAFE_INTEGER;
console.log(max);  // 9007199254740991
console.log((3*max + 1) - (3*max)); // 0

console.log(1 / 0);  // Infinity
console.log(0 / 0);  // NaN
console.log(1 / -0);  // -Infinity
- 많은 언어들과 달리, 정수형과 실수형을 따로 구분하지 않습니다. C로 비유하면
int는 없고double만 있다고 생각하셔도 좋습니다.- 따라서 표현할 수 있는 정확도에 한계가 있습니다. 큰 정수를 다루는 경우 주의하시길 바랍니다.
Infinity,NaN,-Infinity
- 웬만한 산술 연산 다 지원합니다.
String
console.log(typeof("Hello"));  // string
console.log('"I\'m Jeongmin Lee"');  // "I'm Jeongmin Lee"

let x = 7;
console.log(`${x} * ${x} = ${x*x}`);  // 7 * 7 = 49
console.log(x + " * " + x + " = " + x*x);  // ES5 style

console.log("Hello, World!".length);  // 13
console.log('"' + "\t  \t  2147483647\t\t   \n".trim() + '"');  // "2147483647"
`으로 감싸진 string을 Template Literal이라 부르는데,${expression}표현을 중간에 끼워넣으면 해당 표현식의 계산 결과가 문자열로 변환된다.trim(),charAt()등 다양한 Method를 지원합니다.
Null, Undefined
console.log(typeof(null));  // object
console.log(typeof(undefined));  // undefined
null: 아직 모르는 값undefined- (선언은 했지만) 정의하지는 않은 변수
return문이 없는 함수의 반환값- 의도적으로 쓰는 경우는 거의 없음
Boolean
| x | new Boolean(x) |
|---|---|
false |
false |
true |
true |
0 |
false |
NaN |
false |
Infinity |
true |
undefined |
false |
null |
false |
"" |
false |
"something" |
true |
"false" |
true |
[] |
true |
{} |
true |
조건 연산자
- Logical Operators :
&&,||,! - Comparison Operators :
==(!=),===(!==)- strict equality
===- primitive type의 경우, 타입과 값이 동일할 경우에 참
- object의 경우, 참조값이 동일할 경우 참
- loose equality
==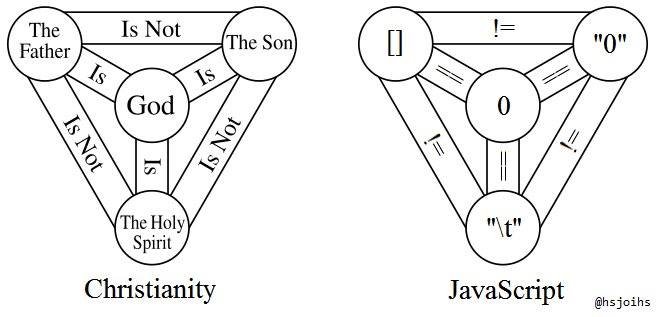
- strict equality 조건에 더해, 타입이 달라도 동일한 값으로 변환할 수 있으면 참
- 의도한 게 아니라면 가급적 쓰지 말 것
- strict equality
Object
Python의 dictionary와 유사한 개념입니다. Object는 여러개의 key-value 쌍을 가질 수 있으며 이 각각을 속성(Property) 이라고 부릅니다. key는 식별자여야하지만 value는 number부터 시작해서 또다른 Object나 함수까지 대부분의 표현식을 담을 수 있습니다.
const circle = {
  x: 1.2,
  y: 1.7,
  radius: 7,
}

console.log(circle);  // { x: 1.2, y: 1.7, radius: 7 }
console.log(circle.x);  // 1.2
console.log(circle["y"]);  // 1.7
circle.y *= 2;
console.log(circle.y);  // 3.4

delete circle.radius;
console.log(circle.radius);  // undefined
console.log(Object.keys(circle));  // [ 'x', 'y' ]
console.log("x" in circle);  // true
console.log("radius" in circle);  // false

const another_circle = { x: circle.x, y: circle.y }
console.log(circle);  // { x: 1.2, y: 3.4 }
console.log(another_circle);  // { x: 1.2, y: 3.4 }
console.log(circle == another_circle);  // false
코드 첫 문단을 보면 마지막 속성을 나열할 때에도 ,를 붙이는 걸 볼 수 있는데, 이를 dangling comma라 부릅니다.
another_circle을 정의하는 줄을 보면 아시다시피, dangling comma가 없어도 코드는 정상적으로 동작합니다.
console.log(JSON.stringify(circle));  // {"x":1.2,"y":3.4}
console.log(JSON.parse('{"x":1.2, "y":3.4}'));  // { x: 1.2, y: 3.4 }
JSON(JavaScript Object Notation)은 JavaScript의 Object를 표현하는 데 널리 쓰이는 형식으로, 문자열 형태를 가집니다. JSON.stringify()로 Object를 문자열화시킬 수 있고, 문자열을 JSON.parse()로 Object화 시킬수도 있습니다.
Array
Python의 List와 유사합니다. 배열이지만 가변적으로 크기를 조절할 수 있으며, 원소의 type이 각각 달라도 괜찮고, 원소에 또다른 List나 Object를 넣을 수도 있습니다.
let squares = [ 0, 1, 4, 9 ];
console.log(squares[2]);  // 4

console.log(squares[6]);  // undefined (No Error)
squares[5] = 5*5;  // (No Error)

console.log(squares.length); // 6
console.log(squares);  // [ 0, 1, 4, 9, <1 empty item>, 25 ]

// Python과는 다르게, X in Y 연산자는 "Y라는 Array에 X라는 인덱스가 있는지" 확인합니다.
console.log(16 in squares);  // false, square[16]은 정의되지 않았으므로.
console.log(5 in squares);  // true, sqaures[5]은 정의되었으므로


let arr = new Array(3).fill("plate");
console.log(arr);  // [ "plate", "plate", "plate" ]
arr.push("my plate");
console.log(arr);  // [ "plate", "plate", "plate", "my plate" ]
console.log(arr.pop());  // "my plate"
console.log(arr);  // [ "plate", "plate", "plate" ]
예제 코드에 명시된 push(), pop() 이외에도 수많은 유용한 Method들이 정의되어 있습니다.
arr.indexOf(elem):arr[i] === elem을 만족하는 가장 작은i를 반환합니다. 탐색에 실패하면-1을 반환합니다.arr1.concat(arr2):arr1과arr2를 순차로 연결합니다.arr1의 원본은 건드리지 않습니다.arr.slice():arr의 사본을 반환합니다. 즉,arr !== arr.slice()입니다.arr.splice(start, [deleteCount]):arr[start]부터arr[start + deleteCount - 1]까지를 삭제합니다.arr의 원본을 건드리고, 삭제한 원소의 배열을 반환합니다.
제어문
대부분의 문법이 C와 비슷합니다.
조건문
if ... elseswitch- 삼항 연산자
? :
Short circuit logical operator ||를 이용하면 다음과 같이 깔끔한 문법으로 기본값을 정의할 수 있습니다. 이를테면 다음 코드의 x와 y는 동일한 동작을 합니다.
const x = user_input ? user_input : "DEFAULT";
const y = user_input || "DEFAULT";
반복문
whiledo ... whileforcontinue,break키워드도 지원합니다.for (... in ...): Object 내 속성들을 순회합니다.
const o = { one: 1, two: 2, three: 3 }
for (let k in o) {
  console.log(`${k}: ${o[k]}`);
}

// Expected Result:
// one: 1
// two: 2
// three: 3
for (... of ...): Array같은 iterable을 순회합니다.
const a = [ 1, 2, 3 ];
let sum = 0;

for (let v of a) {
  sum += v;
}

console.log(sum);  // 6
예외 처리
try {
  [오류가 발생할 것만 같은 코드;]
  throw [예외 변수];  // 주로 Error Object를 던진다.
} catch([예외 변수]) {
  [예외를 처리하는 코드;]
} finally {
  [try나 catch문이 끝난 뒤 실행되는 블록 (생략 가능);]
}
함수
function function_name(x, y) {
  return x + y;
}

const sum = function_name;
console.log(sum(7, 5));  // 12

const o = {};
o.func = sum;
console.log(o.func(7, 5)); // 12

/* Anonymous Function */
o.subtract = function(x, y) {
  return x - y;
}
console.log(o.subtract(7, 5));  // 2
함수 이름 뒤에 ([매개변수 목록])을 붙여 호출 할 수 있다는 점만 제외하면 Object 같은 참조형 Data Type과 사실상 똑같이 다루어집니다.
const dog = {
  age: 2,
  bark() { return 'Woof!'; },
  sleep() { return 'ZZZ'; },
};

console.log(dog.bark()); // Woof!
위와 같이 Object 속성으로 함수를 직접 정의할 수도 있습니다. 이는 일종의 단축 명령어로써 bark: function() { return 'Woof!'; }, 와 동일한 역할을 수행합니다.
this
통상적으로, 함수 안에 쓰인 this는 해당 함수를 속성으로 갖고 있는 Object를 참조합니다. 다만 함수가 호출되는 맥락에 따라서 의도하지 않은 동작을 할 수도 있습니다.
const remocon = {
  channel: 1,
  up() { this.channel++; },
  down() { this.channel--; },
}


remocon.up();
remocon.up();
console.log(remocon.channel);  // 3


let remocon_up = remocon.up;
remocon_up();
console.log(remocon.channel);  // 3. Why?


remocon_up = remocon.up.bind(remocon);
remocon_up();
console.log(remocon.channel);  // Finally, 4.
[함수].bind() 또는 [함수].call() 을 이용하여 this를 명시적으로 지정해줄 수 있습니다.
this의 구체적인 동작은 난해하기 때문에 지금은 잘 이해가 가지 않아도 괜찮습니다. JavaScript에서는 함수가 특정한 위치에 묶이지 않고 자유롭게 이동이 가능하기 때문에 위와 같은 문제가 생긴다 정도만 알아두세요.
Arrow Notation
let sum1 = function(x, y) { return x + y; }
let sum2 = (x, y) => x + y;
console.log(sum1(3, 4) === sum2(3, 4));  // true
function이라는 키워드 대신 =>을 사용하여 함수를 정의할 수도 있습니다.
([매개변수1], [매개변수2], ...) => {
  [구문1;]
  [구문2;]
  ...
  return [표현식];
}
- 함수의 구현에
return [표현식]밖에 없다면,([매개변수]) => [표현식]으로 쓸 수 있습니다. - 매개변수를 하나만 받는다면, 괄호로 감쌀 필요 없이
[매개변수] => [표현식]으로 쓸 수 있습니다. - Arrow Notation의 경우
this가 lexically bound하는 특성을 갖습니다. 그래서 위에서 발생한this관련 문제를 예방할 수 있습니다. 당장 알아야할 내용은 아니니 참고만 해주세요.
Array#map(), Array#filter()
let degrees = [ 15, 30, 60, 90, 180, 270 ];
console.log(degrees.map(x => x * Math.PI / 180));
console.log(degrees.filter(x => x >= 90));

// Expected Output:
// [ 0.2617993877991494,
//  0.5235987755982988,
//  1.0471975511965976,
//  1.5707963267948966,
//  3.141592653589793,
//  4.71238898038469 ]
// [ 90, 180, 270 ]
Array#map()과 같이 함수를 매개변수로 넘겨줘야하는 메서드들도 많이 있으며, 이를 잘 활용하면 Array를 매우 효율적으로 다룰 수 있습니다.
arr.map(f):[ f(arr[0]), f(arr[1]), ..., f(arr[arr.length - 1]) ]arr.filter(f):f(arr[i])가 참인arr[i]만 남긴 배열을 반환arr.forEach(f):arr의 각 원소에 대해f(arr[i], i, arr)실행arr.some(f):f(arr[i])가 참인arr[i]가 하나라도 있으면true를 반환, 유사한 함수로arr.every(f)가 있음.arr.find(f):f(arr[i])가 참인 첫 번째arr[i]을 반환, 탐색 실패시undefined를 반환. 유사한 함수로arr.findIndex(f)가 있음.
스코프
let x = "Public";

{
  let y = "So Secret";
  console.log(x);  // Public
}

console.log(y);  // ReferenceError
블록 { } 안에서 let으로 변수를 선언하면, 블록 바깥에서는 그 변수에 접근할 수 없습니다. (위 예제의 y) 변수가 접근 가능한 “영역”을 스코프 라고 부릅니다.
let get_secret;

{
  let y = "So Secret";
  get_secret = () => y;
}

console.log(get_secret());  // So Secret
get_secret() 함수는 y에 접근할 수 있는 스코프에서 정의되었습니다. 이 함수는 전역 스코프에 대입(assign)되고 y 스코프가 끝난 뒤 호출합니다.
눈여겨볼 점은 y라는 변수가 스코프가 끝났음에도 여전히 존재한다는 점입니다. 따라서 get_secret()을 이용해 간접적으로 스코프 바깥에서 스코프 안의 함수에 접근할 수 있습니다. 이러한 현상을 “클로저”라고 부릅니다.
let make_vault = function(secret, password) {
  return {
    get_secret(user_input) {
      return user_input === password ? secret : null;
    }
  }
}

let vault = make_vault(17, 1234);
console.log(vault.get_secret(4321));  // null
console.log(vault.get_secret(1234));  // 17
함수 또한 독자적인 스코프를 구축합니다. 위 예제에서는 클로저를 이용해 함수 스코프 바깥에서 secret이랑 password에 접근하는 예제를 보여주고 있습니다.
Immediately Invoked Function Expression
x = 3;
(function() {
  var x;
  console.log(x);  // undefined
})();
가끔 JS 코드를 보다 보면 익명 함수를 만들고 이를 ( )로 감싸서 즉시 호출(())하는 패턴을 발견할 수 있습니다. 이를 IIFE라고 부릅니다. 굳이 이런 표현을 쓰는 이유는 독자적인 스코프를 구축하기 위합니다. 만약 위의 코드가 IIFE 패턴을 따르지 않았다면 아래의 코드가 만들어졌을 텐데, 이때는 스코프 바깥에 있는 x = 3이라는 구문이 스코프 안의 var x에 간섭해서 예상치 못한 결과가 나타날 수 있습니다.
물론 이 단순한 예제의 경우 var x가 아닌 let x를 사용함으로써 해결할 수 있습니다.
x = 3;
{
  var x;
  console.log(x);  // 3
}
객체 지향
일관된 구조의 Object를 생성하고 싶은 경우, class를 선언하여 해결할 수 있습니다.
class Account {
  constructor(name) {
    this.name = name;
    this.money = 0;
  }

  deposit(amount) {
    (amount > 0) && (this.money += amount);
  }

  withdraw(amount) {
    return this.money > amount ? (this.money -= amount, amount) : 0;
  }
}

let my = new Account('JM L.');
console.log(my);  // Account { name: 'JM L.', money: 0 }
console.log(my.money);  // 0
my.deposit(5000);
my.deposit(-2000);
console.log(my.money);  // 5000
console.log(my.withdraw(2000));  // 2000
console.log(my.withdraw(4000));  // 0
클래스는 new 연산자를 이용하여 구현할 수 있습니다. 구현체를 인스턴스(Instance) 라고 부릅니다. 클래스 안에 정의한 함수는 메서드 라고 부르며, 메서드 내에서 this는 인스턴스 Object를 의미합니다. constructor() 함수는 생성자 라고 부르며, new 연산자에 의해 함수가 구현될 때 제일 처음으로 호출되는 함수입니다.
class ImprovedAccount extends Account {
  static get_id() {
    ImprovedAccount.id = (ImprovedAccount.id + 1) || 1;
    return ImprovedAccount.id;
  }

  constructor(name) {
    super(name);
    this.id = ImprovedAccount.get_id();
  }

  withdraw(amount) {
    if (amount < 0) throw new Error("withdraw(): amount should be nonnegative!!");
    return super.withdraw(amount);
  }

  toString() {
    return `[${this.id}] ${this.name}'s Account: ${this.money} Won`
  }
}

console.log(new ImprovedAccount('DH K.').toString());

let jsp = new ImprovedAccount('JS P.');
console.log(jsp.id);  // 2
console.log(my instanceof ImprovedAccount);  // false
console.log(jsp instanceof ImprovedAccount);  // true
console.log(jsp instanceof Account);  // true
jsp.deposit(10000);
console.log(jsp.withdraw(4000));  // 4000
jsp.withdraw(-100);
기존 클래스에 있는 속성과 메서드를 보존한 채로 확장된 기능을 구현하고 싶은경우, 클래스를 상속 할 수 있습니다. 이때 상속당한 클래스를 Superclass, 상속한 클래스는 그 Superclass의 Subclass라고 부릅니다. 클래스를 상속한 뒤 함수를 재정의할 수 있는데, 이를 함수 오버라이딩(Overriding) 이라고 부릅니다. 함수를 오버라이딩 하는 경우 super 키워드로 Superclass를 참조할 수 있습니다.
앞에 static 키워드를 붙여진 메서드를 클래스 메서드 라고 부릅니다. 일반 메서드와 달리, 클래스의 모든 구현체는 같은 클래스 메서드를 참조합니다. 클래스 메서드 안에서 this는 인스턴스가 아닌 클래스 변수를 가리킵니다. 그러나 그보다는 클래스 이름을 이용해 클래스 변수에 접근하는 것이 혼란을 막기 좋습니다.
[인스턴스] instanceof [클래스]는 [인스턴스]가 클래스의 구현체거나 클래스의 Subclass의 구현체일 때 참입니다.
웹 브라우저 제어하기
사실 지금까지 설명한 JS의 적지 않은 부분(for ... of ..., class, Arrow Function)은 ES6에서 새로 개발된 기능입니다. React로 개발하기 위해서는 ES6 문법에 반드시 익숙해질 필요가 있지만, 웹 페이지에서 JS를 쓸 때는 잊어선 안 될 한 가지 사항이 있습니다.
만약 “그 브라우저”에서도 문제없이 돌아가는 스크립트를 작성하려면, ES5 표준을 지켜 개발하는 것이 바람직할 것입니다. 또는 ES6 코드를 작성한 다음 Babel과 같은 트랜스컴파일러를 이용해 ES5 코드로 변환하는 방법도 있습니다. 본 세미나에서는 Babel로 트랜스컴파일 하는 과정까지는 다루지 않을 것이지만, 실제로 JS를 작업하실 때는 이를 반드시 염두에 두시길 바랍니다.
DOM
<!DOCTYPE html>
<html lang="en" dir="ltr">
  <head>
    <meta charset="utf-8">
    <title>JS Seminar</title>
  </head>
  <body>
    <input type="button" id="btnAdd" value="Add">
    <input type="button" id="btnRemove" value="Remove">
    <div id="content">
    </div>
    <script type="text/javascript">
      let counter = 0;
      let content = document.getElementById('content');

      document.getElementById('btnAdd')
        .addEventListener('click', function() {
          counter++;
          content.innerHTML += `<p>${'*'.repeat(counter)}</p>`;
        });

      document.getElementById('btnRemove')
        .addEventListener('click', function() {
          if (counter > 0) {
            counter--;
            content.removeChild(content.lastElementChild);
          } else {
            alert('There is nothing to remove!');
          }
        });
    </script>
  </body>
</html>
document는 현재 HTML 파일의 DOM(Document Object Model) 구조를 보여주는 Object를 반환합니다. HTML 수업에서 간략히 설명했던 대로, HTML 문서를 구성하는 HTML 태그 사이의 관계는 일종의 트리로 표현할 수 있는데, document의 메서드를 호출함으로써 해당 트리에서 관심있는 Node를 가져오고, 그것의 HTML 속성을 편집할 수 있습니다.
EventTarget.addEventListener(type, listener)Element.getElementById(id): 조건을 만족하는 하위 Node 반환Element.innerHTML: 해당 HTML 태그 안의 내용 (HTML 코드로 작성됨)Node.removeChild(child)ParentNode.lastElementChild- 더 자세한 내용은 : Document Object Model (DOM) - MDN
기타 도움될 만한 개념
- Date : JavaScript에서 날짜 및 시간을 다루는 방법
- Map : 순수하게 (key, value) 쌍만을 다루는 자료구조
- 속성 순서가 보장된다는 점에서 일반적인 Object와 차별점을 가짐
- Set : 중복을 허용하지 않고 순서가 없는 자료구조
- Ajax : 웹브라우저에서 JS로 다른 서버와 통신하는 방법
- jQuery : DOM 조작에 유용한 JS 라이브러리